Pages

Thursday 29 July 2010

My Model Room: #6 Furniture

The next part of my model room project is some more furniture; drawers, desk, shelves and wardrobe.
My furniture is grey with pink plastic beading on the edges. Who knew that those two colours would go well together.

I used cardboard packaging and other bits of card for the furniture and painted it all grey. I also cut lines into it to give the illusion of separate drawers.
For the pink beading I mixed PVA glue with pink acrylic paint because this would give the plastic look I wanted. I applied the mixture with a syringe as this gave me a very thin line...although there are some parts that are a bit messy, you can just ignore those.

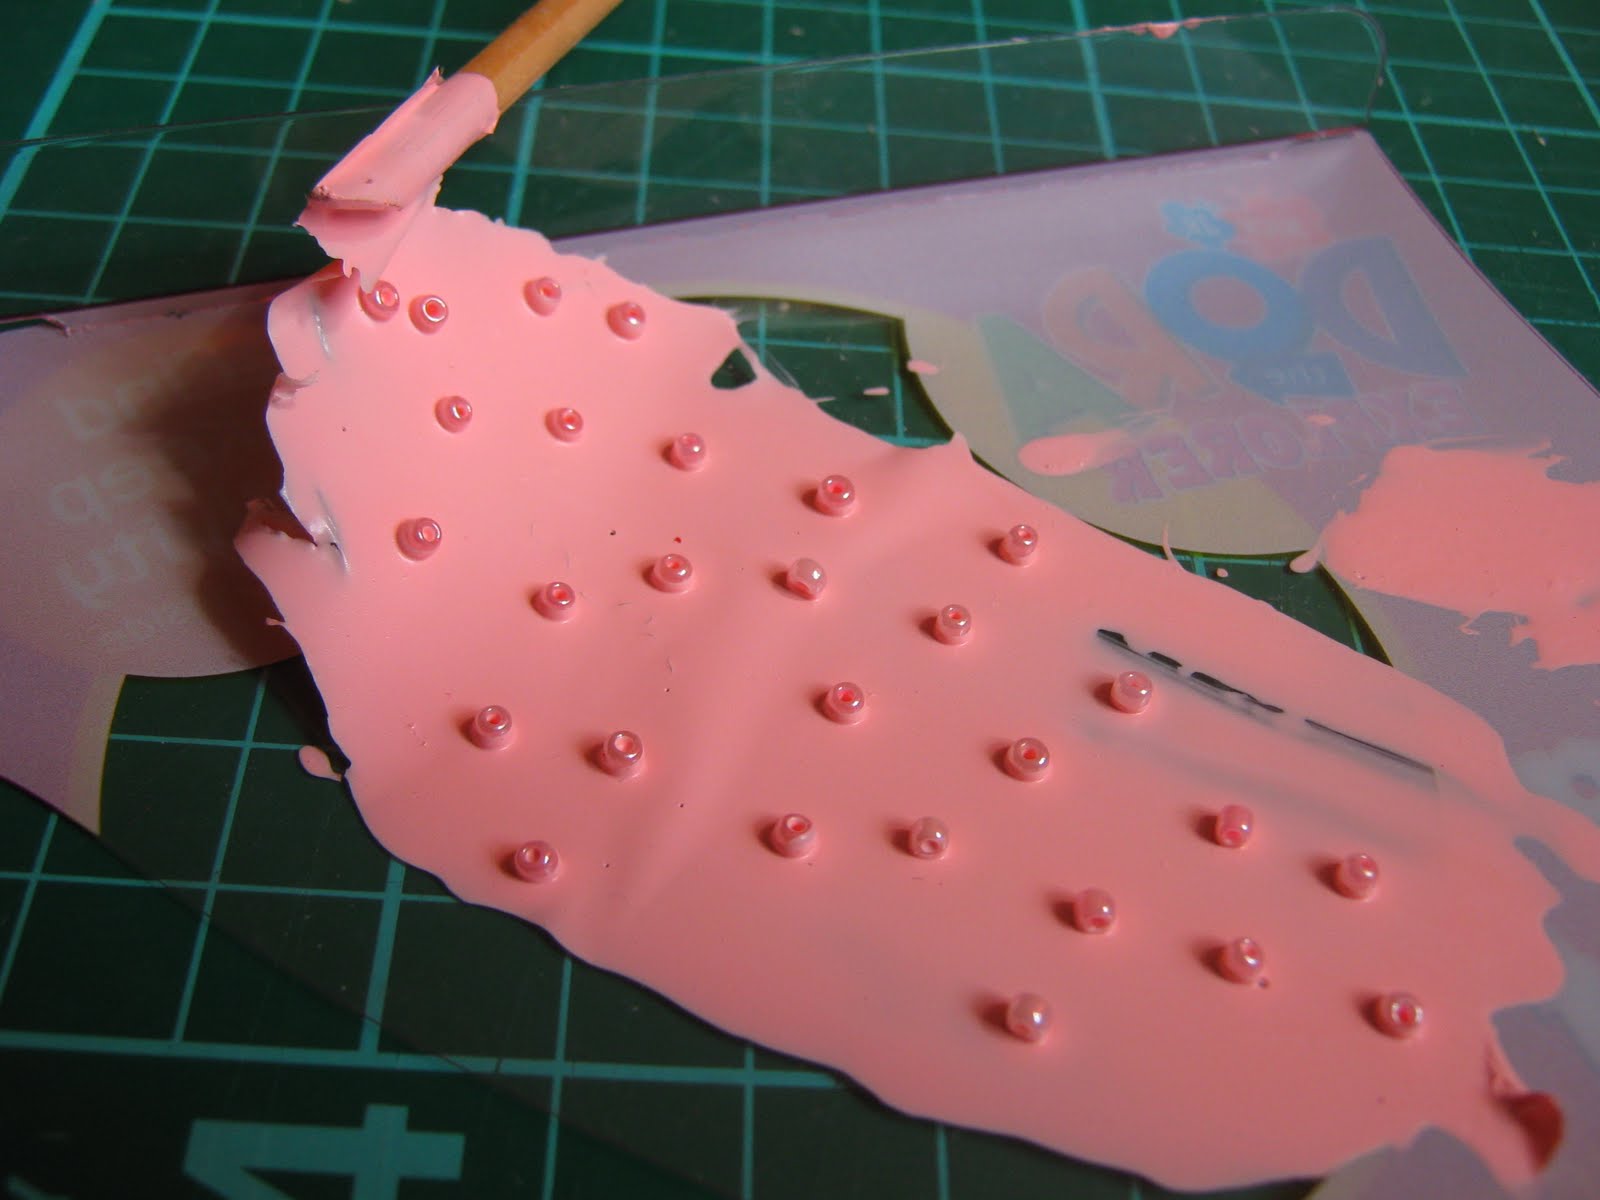
For the drawer handles I mixed up some more glue and pink paint and spread it thinly on a bit of plastic. I then put pink seed beads in it and waited for it to dry. Then I cut circles out around the beads. I'm sure there's a much easier way to make the drawer handles, but this way worked for me.

Wednesday 28 July 2010

New paintings

Here are two new oil paintings

Sherringham beach, Norfolk

Manley beach, Sydney.

I do love the beach!

And if y'all haven't already noticed, I've added a new page to my blog showcasing some more of my paintings.

Sunday 25 July 2010

Pizza

So we've all seen my felt donuts, right? Well I wanted to try making a different food out of felt, and I picked pizza.

What we have here is a delicious pepperoni pizza with a tomato sauce covered base and cheese, topped with pepperoni and green...bits. I don't know, peppers? Herbs? Either way they look cool.


Here's the break down of how I put it together.

Friday 23 July 2010

My Model Room: #5 Bunk beds

I couldn't have a simple single bed in my room, could I? No, I have to have tricky bunk beds which definitely gave me more of a challenge. They go back to the days when my two sisters and I used to all share a bedroom.Then they both got their own rooms and I was left with the big room to myself. And the bunk beds.

For the main part of the beds I used a cereal box which I covered with lollypop sticks that I had painted. I then stuck four kebab skewers to the corners of the bed and crossed my fingers that they would stay up, otherwise I was going to have to come up with a plan to attach the whole thing to the wall, but it worked and the whole thing is free-standing!

Using more lollypop sticks and kebab skewers I added the finishing details to the beds.
I'm now out of lollypop sticks, feel free to donate.

I also made the ladder for the bunk beds in the same way; small bits of painted wood and wishful sticking.

I made two mattresses out of foam and covered them in fabric, tucking it in at the sides; like a real bed!

Then Anya and Tara from Buffy stopped by to test them out. They didn't even have the decency to take off their shoes.

Wednesday 21 July 2010

Birthday goodies

When my friends asked me what I wanted for my birthday I just answered "crafty things" and they definitely delivered!
I got a packet of felt, feathers, pipe cleaners, shells, mirror bits, sequins, lots of beads and 2 tub o' buttons.

So then I got to thinking about what I could make with it all.

How about this button covered wine glass from Creative Jewish Mom.

Or I could use the shells to decorate pots like Martha Stewart.

And I could use the pipe cleaners to make fun finger puppets like Sparkplugging.

The possibilities are endless.

Monday 19 July 2010

Hedgehog Rolls

For my birthday picnic I made hedgehog rolls, because what's better than freshly baked bread rolls? Freshly baked bread rolls in the shape of hedgehogs. Here's how:

First you need to make the bread dough using a recipe and method of your choice. For convenience I made mine in our bread machine using the following recipe;

240ml water
1 egg
450g strong white flour
1tsp salt
2tsp sugar
25g butter
1 1/2tsp dried yeast

This makes 12 rolls.

Once you've got the dough, and done all the kneading that needs doing, divide the dough into the required number of piece and make them into ovals with a pinch end. This will be the hedgehogs nose. 
Then use scissors and cut into the rest of the dough to make the hedgehog spikes. Make sure the dough ball is covered in plenty of flour or the spikes won't stay. 

Push two currants into the dough for eyes. I tried a couple with chocolate drops but they just melted off in the oven.

Put the rolls onto a greased tray, cover with cling film and leave somewhere warm. Like the preheated oven. Mine was at gas mark 7. Google the conversions.
I left the rolls to rise for 10 minutes then put them in the oven for about 20 minutes.

The hedgehogs grew quite a bit, and sadly many of them lost their eyes.

Here's one of the lucky guys.
Or not so lucky, as he got eaten anyway. Nom nom nom!

Friday 16 July 2010

Birthday Cakes: Part 2

Part 2 of my best birthday cakes:

When I turned 14 I was very much into pink and guitars, so naturally I had a cake in the shape of a pink guitar.

This is one of my favourite cakes to date. By age 15 my obsession with the tv show Lost was already in full swing and my birthday cake reflected that. The airplane fuselage was a fondant icing covered chocolate swiss roll, broken in half of course, I used mint chocolate Match Makers for the trees and blue butter cream icing for the ocean, and I even included Jelly Baby survivors.

Tv also influenced my 17th birthday cake with this edible scrubs top.

Last year, my 19th birthday, I made this clever construction cake featuring Playmobile people carrying candles, spreading chocolate spread and applying rolls of fondant icing.

And this is my cake for today! My 20th birthday. A Chevy truck chocolate cake with coconut covered hay bales and cake/chocolate guitar and cowboy boots. And Oreo wheels. Check out those rims. And the picture in the window is Taylor Swift's "just a boy in a Chevy truck that had a tendency of getting stuck on back roads at night" from her Tim McGraw video.

Wednesday 14 July 2010

Birthday Cakes: Part 1

It's my birthday on Friday so I thought now would be a great time to take a trip down memory lane and show y'all some of the best birthday cakes I've had throughout the years. There's quite a few so I'll show you some now, and then finish up on Friday where I'll end with this years addition.

That's me, my Rupert the Bear teddy, and my Rupert the Bear cake. Happy 3rd birthday!

For my 6th birthday it's an artist and easel. Always with the arty.

I had a penguin birthday party when I was 7, complete with penguin cake. And notice the mini penguin cakes with a single candle. My Mum always did that so that my friends had a candle to blow out too.

By the age of 12 I was decorating my own birthday cakes and this one was a monkey to fit in with then growing collection of stuffed monkeys.

For my 13th birthday I went go-karting so I had a cake to match. Complete with Jaffa cake wheels and Playmobile passengers.

Come back on Friday to see the rest.

Monday 12 July 2010

Make it work!

This is Tim. You know, Tim Gunn, from Project Runway, and Tim Gunn's Guide to Style.

My sister and I styled this Tim Gunn doll. She did the suit and I did the face. 

Admire the craftsmanship; the hair is individually sewn strands of wool.
Make it work!


Friday 9 July 2010

My Model Room: #4 Window

The next step with my model room was to install the window. I started by making the window sill out of a strip of corrugated card which I painted and cut strips out of to give the impression of individual tiles.

Then I cut two window frames out of thick white card and glued a rectangle of acetate between them. I then stuck this in the space.

I made the handles on the windows out of silver paper and card, and cut lines into window frame to show the individual windows.
Splendid.

Wednesday 7 July 2010

Painted Pooch


I just finished this painting which is a commission for a friend's friend of their dog.
It's good practice for painting something other than portraits of people and landscapes, and it's good painting practice in general as I didn't do much in my last term at uni.
What do you think?

Monday 5 July 2010

1940s fashion


This weekend I walked in a fashion show of 1940s clothes as part of the World War 2 VE Celebration organised by the Arts Centre I work at. There were some awesome clothes and I love the hair styling.

Here are some crafty things of a similar vintage theme:

Get the pattern for this vintage apron on Sew 4 Home.

Etsy user Rumble Seat Cat has a 1940s Glamorous Hairstyles Styling Book. This would have been useful when doing my own hair for the fashion show. 

And how about a knitted gas mask? Bit too creepy? Found on Trend Hunter.

Friday 2 July 2010

My Model Room: #3 Carpet

After much deliberation I decided to use a jumper for the carpet in my model room. I searched through charity shops but in the end found this splendid size 14 wrap around cardigan for £2 at my local market. Buying a piece of felt the right size would probably have been just as much money, if not more, and using actual carpet would have been too thick.
The colour of the cardigan is a little darker than my carpet, but I didn't think I was going to find anything better so I went with it.

I cut the shape of the floor from the back panel of the cardigan, and still have loads of fabric leftover. Then I stuck it in place with PVA glue.

Next I needed to make the skirting board so I gathered lollipop sticks, cut off the rounded ends and carved an angle into them. This took a while. Ideally I would have preferred long strip of wood, instead of having to join lots of little ones, but you work with what you have.

I did get to use my new craft knife set though. It was 99p (from the 99p shop of course) and it all comes in a pink case. Winner.

Then I painted the pieces of skirting board with white acrylic paint and stuck them in place with PVA.

Next up; the window