Pages

Showing posts with label photos. Show all posts

Thursday, 24 October 2013

Dog Photo Holder

I'm gearing up for Christmas craft fair season so I made this little guy to add to my stock.
I sold some of the animal photo holders I made last year, so I thought I would make some more.

The dog is made of Sculpey and when moulding it it spends a long time looking really bad until suddenly it looks like a dog. There's a lot of doubt in that first period though.

I used a pokey tool to give the fur a little texture, and painted it with acrylics.

I think my favourite part is the tongue!

What other animals do you think I should make? I am open to suggestions

Tuesday, 15 October 2013

Double Exposure

When I was at uni one of the guys on my course produced amazing double-exposure photographs and ever since his presentation about his work at the start of 3rd year I've wanted to try the technique.
Check out Rob's work here.

Once I'd found a film I spent over a year taking photos.
I finished the film once and then put it back in the camera for a second time round.
Here are some of the best photos from that roll of film.

This one is my favourite.
An image of my cousin overlapped with a sign on a gate.

The only planning I did was to only take landscape and building type photos on the first go round of the film, and then take photos of people on the second go round. 
Because the whole thing took over a year (as I kept forgetting to bring the camera places) there was no way of remembering what I had taken the first time to match it with something specific.
And that's the fun of it!

In a lot of the photos one of the overlapped images is a bit faint and that's because I instinctively took bright photos, and of course two brights make an even brighter.
So if I were to do this again I would not take so many photos of the sky!

 The process creates some interesting juxtapositions.
The background photos were taken in Norwich while I was at uni and at home, and the people include my family, my friends from home, from uni and from camp.
So it's interesting when a friend from home ends up with a Norwich background even if they've never been there.
The opposite happened with this photo which has a faint image of my sister over lapped with a scenic view of the town she lives in, which happened completely by coincidence.

The next time I do this I'd also like to experiment with textures as the background image, not just landscapes or buildings, but still with people being the over lapping image. 

Of course this type of image could be created on Photoshop but the image choices would be too deliberate.
Kicking it old school with a roll of film is much more fun.
And developing the film was only £4 at Tescos which isn't too bad these days.

Thursday, 5 September 2013

Rustic Wooden Photo Frame

 
 I made a photo frame!

 This project was good because it used up two things I've had for ages.
The first was this plain wooden photo frame I bought from Hobbycraft years ago.
It was probably on sale. I don't think I would have bought it if not.

 
The second thing I got to use up was some of these little wooden things that come with canvases.
I used some of them a while back with these garden fence cards but I've still got so many more.
I quite liked the rustic, beach shack type feel of the little planks around the frame so I went with it.

I used wood glue to attach the wood to the frame and left it to dry under some heavy books.

I picked out some wood stain from the garage and did some test pieces to decide which colour I liked better.

 I went for the lighter one and applied it with an old rag.
There were some parts where the glue had got on the surface of the wood so I had to sand the glue off so the stain would...youknow, stain.

Any excuse to show you my signed Ian Somerhalder photo

Then I popped a photo in the frame and it was done.
This was such a quick and easy project, and it's given me loads more ideas for decorating plain frames.

Thursday, 22 August 2013

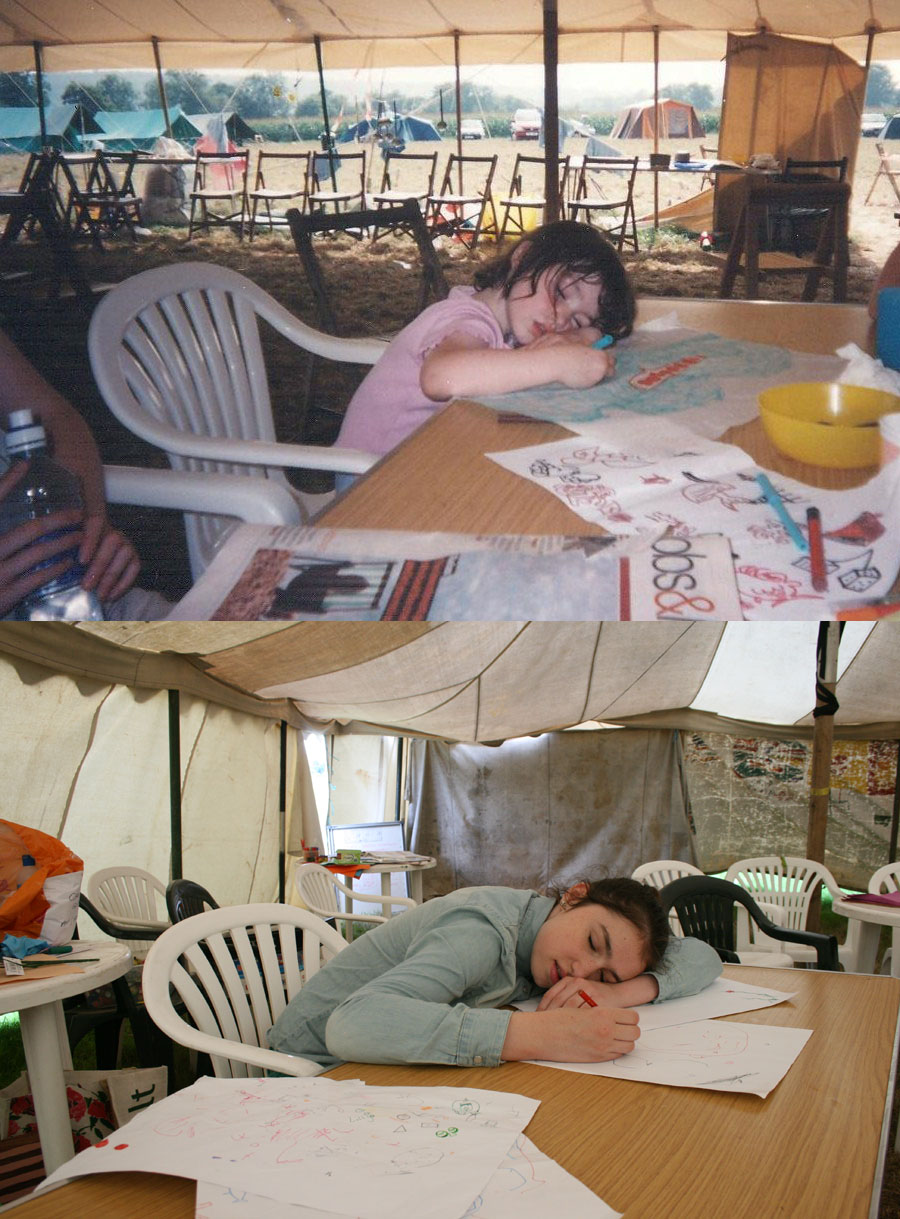
Then and Now

There are a lot of these projects around on the internet so I thought I would try recreating some photos myself.
I went to camp last week armed with a collection of old photos.
I don't know the exact dates of all the 'before' photos, but they're all at least 10 years old.

My Dad and I.
Same guitar, different car.

My Dad again, wearing the exact same anorak.

Isobel at 4 and 14.
In the first photo she was colouring, fell asleep, then woke up and just continued colouring.

Me at 3 and 23.
Proof that I have grown!

Mark at 12 and 22.

My cousin Miriam and I.
She's four years younger than me but as you can see, she's over taken me in size.
I used to arrive at camp with a bag full of clothes I'd out-grown to give to her, but I can't do that now.

This was really fun to do and I definitely want to do some more.


Friday, 25 January 2013

Photo Books

I'm the picture taker of my group.
When I went away to uni my friends back home said it was as if they didn't get up to anything because noone was there to document it.

So I have a lot of photos and I like physically flicking through pages of these photos, as opposed to just pressing the arrows on my computer a bunch of times.
For many years I've been selecting photos, resizing them, printing them out, cutting them up and putting them into self-adhesive photo albums. The big kind that take up a lot of shelf space.
And I'd think, 'surely there is an easier way.'

There is. It's photo books.

I got these all printed from Snapfish (not sponsored. But boy, do I wish it was!)
The big one is a selection of my photos from June - October 2012. Including my graduation.
Yep, that happened.
I like having the photos different sizes, something that would have caused too much brain ache to do when I was printing and cutting and sticking photos into an album.

I also got some Christmas presents made up.
One for my oldest sister and one for my Grandad.

My sister's book had photos from our holiday to Nashville and New York.
It came in very handy over Christmas when we were telling all our family that were visiting about our trip.

Including this photo which she would definitely not mind me sharing with the internet.
Yes, she met Jake Gyllenhaal.
Yes, she'll tell anyone who will listen. 

My Grandad's book, titled 'Grandaughters' contained just that; photos of my sisters and I, and my cousins.
I put a mixture of new photos and old ones when I was a lot tinier.

The books turned out great and I would recommend waiting until the sites have offers - which right before Christmas they did - so you can get more pages for your money.

Tuesday, 6 November 2012

Clothes peg photo holders

 A few weeks ago I finally got a film developed from a camera that we didn't realise still had a film in.
The film was about half way through so over the summer I used up the rest of the film on my birthday, at camp, and hanging out with my family.

We had no idea what was on the first half of the film so I was really looking forward to getting it developed.
It turns out the first photos (00 - 11 on the thumbnail sheet) are from my sisters' first trip to New York 8 years ago! They thought they'd broken the camera and/or lost the film.
It was a wonderful coincidence that I got these photos developed a week or two after coming back from our trip to New York.

So now I have some lovely photos printed, instead of stored on my computer, that I want to have on display.
I could just buy some more photo frames, but I don't want to do that. I'm more creative than that.


I had the idea to use clothes pegs to hold up a photo.
It's great because I can easily change the photo on display.
I had a couple of ideas of how to embellish the pegs.
First I simply wrote on them with who's in the photo and where and when it was taken.

Then I tried cutting out some decorative paper and sticking it to the pegs.
Pretty.

I also tried decorating the pegs according to the photo. So I cut out some grass from green card, since the photo was taken while we were camping, and stuck that to the pegs. 

I even got some thin wire which I attached to the pegs and added some little bees to fit with the outdoorsy theme.

I think adding balloons to the wire would look really great with a birthday photo.
Any other ideas?

Have any of you discovered some old photos you thought were gone forever?

Tuesday, 30 October 2012

Owl

As you saw on Sunday's post I've been using Sculpey again and this time...

...I made an owl!

I love his eyes the best.

I used a needle to put all the feather markings on the model.

Then I painted him up with acrylic paint.

Now he joins the other animal photo holders.
I'm gearing up for the Christmas craft fair season so I've been busy making to build up my inventory.
I hope these photo holders sell well!

Sunday, 21 October 2012

This Week I...

 On Thursday evening I modelled in a 1970s themed photoshoot for the Arts Centre.
In November we're having a weekend festival celebrating the 70s and 80s, so leading up to that we're doing a lot of smaller projects around that theme.

It was a lot of fun.
We had girls from the local college come and do our hair and make-up.
(I've very quickly learned to not bother to try and hide my braces in photos.)

And we dressed up in 70s clothing.
I wore one of my Mum's old dresses.
You can see more about it here.

I roped two of my friends into modelling too and this is what they were wearing.
So much fabric!
I can't wait to see the professional photos.

Also this week I...
*Did a lot of photocopying and stapling at work. Standard intern behaviour.
*Had a girls night with chocolate and The Lucky One.
*Went to the cinema with my sister to see Ruby Sparks.
*Baked some 'thank-you' cookies for my friends for helping out with the photoshoot. Chocolate chip of course!

What did you guys get up to?

Friday, 5 October 2012

Photo book

When I saw this handkerchief journal on A Beautiful Mess I knew that I just needed an excuse so that I could make one myself.
A friend's birthday is the perfect excuse

Instead of using a handkerchief, which I didn't have, I just sewed the cover out of a piece of fabric.
I put some thick card into the front and back so the the cover wasn't floppy.

This was my first time using the zig-zag setting on the sewing machine. It was very exciting.
I feel like a whole new world has opened up to me.

For the pages I did like the original tutorial did and used pages from an old book.
Now some people have a big issue about destroying old books. I don't.
Sorry!
I have one old book that I bought for £1 and whenever I want to use book pages, which isn't all that often to be honest, I use them from that one book.

I used 12 book pages as that's the maximum amount that the sewing machine needle would comfortably go through.

I used this book as a photo memory book for my friend Stef.
 
I put one photo per page and added some coloured paper for added interest.

I also wrote the date and occasion because as we get older it's going to be harder to remember this stuff.
I mean, Stef's 23 now! That's almost ancient!