Pages

Sunday, 30 June 2013

This Week I...

...went to the most amazing place!
My Mum found out about Scrap Stores and we took a trip to our local one.
It's two floors of all kinds of scrap materials; fabric, card, foam, tubes, confetti, containers, keyrings, tiles...
You pay a yearly membership fee and then you can take whatever you want.
I picked up some vinyl-type fabric in cool patterns, some squares of mountboard, some weird foam stuff and some little plastic tubes. They looked useful!

Last weekend our garage was full of scarecrows and this weekend we had a garage sale.
The village had organised a garage sale trail and over 70 houses were participating, including our next door neighbours. Luckily we had really nice weather so we didn't mind hanging out on the drive all afternoon.

And speaking of scarecrows, our entry into the scarecrow competition made it into the local paper!
And at the village fete we found out we were only 2 votes away from 1st place.

Don't forget that Google reader is shutting down, like, tomorrow!
If you're a follower of my blog make sure you subscribe with a different reader, like Bloglovin. I wouldn't want to lose you!
And if you're not a follower, why not become one!

Ok, enough exclamation points. How was your week? 

Thursday, 27 June 2013

Scarecrow Festival

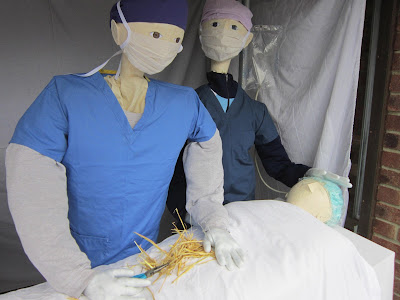
As I mentioned on Sunday, my village had it's scarecrow festival this past weekend and this was our entry!
This was our first time entering because the last few years I've been away at university.

To make the scarecrows I made papier mache heads using ballons and added card for the noses and ears and a big yogurt pot for the necks.
We stuffed the bodies with scrunched up newspaper.
That was a fun Sunday afternoon.

My first idea for the scarecrow set up was an operating theatre, since I have the scrubs, so we went with that.
I was going to make something gross and organ-y for the operation part, but then I had the bright idea to have straw coming out of the body, since it is a scarecrow. 

My Dad and I definitely went overboard with the details.
We got an old computer monitor and I painted heart monitor graphics on to acetate to go on the front.
The equipment tray has syringes still in wrappers, pliers, tweezers, a jar opener and, my favourite; scissors + cotton ball = swab!

Someone (me) had the genius idea to put the scene in the garage.
This was primarily because I thought it would frame it nicely and we could put sheets up behind, but it came in handy as we had a few rain showers over weekend and it got a bit windy, and our scarecrows were fine throughout.

The scarecrow festival was also a competition and people could vote for their favourites.
We came in second!
The winner was a Mad Hatter's Tea Party set up which spread over two gardens, so this photo is only part of it.


We've already started thinking about next year's entry. It may have something to do with another favourite tv show of mine...

Tuesday, 25 June 2013

Miniature Fireplace

This is what was in the package to the Petersiks from Young House Love.
A miniature replica of their fireplace!

I've been waiting until they'd posted about it to share it with you.
Which they have done. Check it out here, especially if you want a size comparison of the fireplace with a chihuahua. 

I've been known to make the occasional miniature fireplace and when I saw their post with a step by step of how they made their actual fireplace the two things connected.
I thought I would make their fireplace, and then maybe see if they wanted it. It's not like I had anything else to do (still no job).
This would also allow me to try using plastic materials which I'd been introduced to on the model making course I took, instead of card and wood.

Half way through the process of making the miniature the Petersiks announced they were moving house. At first I thought 'oh no!' but then it was even more of a reason why they should have this model. As a memento of the fireplace they built in their own house.

As soon as the model was finished I emailed a photo to the Petersiks and received the best email back from Sherry. It started with an excited 'AHHHHHHHHH!'
I love it when people are emotive over email, and Sherry is that fo sho.
#bloggerfangirlmoment
A few more emails back and forth and the mini fireplace was off to Virginia.

The hardest part of the model, or rather the most time consuming, was the tiling. I had to cut and then lay so many tiny tiles.
And then do the grouting.
The tiles were made from thin pvc card, painted with acrylic to look marble-y, and then cut in to individual tiles. 

Recreating the decorative trim was tricky, but achievable!

I'm really proud of this fireplace, and am pretty overwhelmed by the response it's got over on Young House Love.
I'm also really happy that I could give the Petersiks a way to take something with them from their old house to their old house.

Sunday, 23 June 2013

This Week I...

...enjoyed Stotfold's Scarecrow Festival!
This is one of the annual things that makes my little town seem very Stars Hollow-y.

Here are some of my favourite entries.
I particularly like the model pigeons. They look so real!

Even though I think the woman looks like a creepy ghost lady, this one was very well put together.

My friend Lizzi's Mum put together this one, kind of as a comment on what a rubbish summer we're having.
This Santa has the face of David Beckham. When I asked why the creator just said, 'because I like David Beckham.'
Fair enough.
The Santa also had a naughty and nice list so I added my name to it.
On the nice side of course.

I haven't even seen Despicable Me but I love this one.

And just to prove there were some traditional scarecrows; here's one in a bin.

This was the first year that my family entered a scarecrow, but that's a whole post in itself, so come back later in the week to check that out!

Thursday, 20 June 2013

Shell Hair-slides

I got the idea for these shell hair slides from Quiet Lion Creations.
Make sure to check out the original tutorial, especially since she went for really cool designs on her shells.
I went for a more natural look.

To make the shells into hair slides you fill them with Fimo/Sculpey. It's a chance to use up any odd bits you have because the clay won't be seen so it doesn't matter what colour it ends up as.
Then you press the hair slide into the Fimo, remove the slide, bake the clay still in the shell, then glue the slide back into the clay.

I painted my shells with nail varnish. One pair is silvery/pinky/redish.

And the other pair gradients from white to light blue. 

I think the shells look really cute slotted into a messy up-do.

Tuesday, 18 June 2013

Snickerdoodles!

I've already shown you guys the best cookie I ate on my holiday last year.
But I bet you were wondering what my second best cookie of that holiday was.
Well, as you may have guessed by the title of this post; it was a snickerdoodle cookie.
Not only that, it was a snickerdoodle cookie served on the flight home!

That was the first, and prior to this baking session, the only time I'd had a snickerdoodle cookie.
I don't know why it took me so long to try baking them myself.
I googled around for a recipe and lots of them had 'cream of tartar' listed in the ingredients.
I was thinking, 'what is this cream of tartar and why do people want me to put it in my cookies??'
Turns out it's kind of like baking powder or bicarbonate of soda.

So with the cream of tartar purchased and a recipe acquired (this one from Nigella, even though I was a bit put off that cinnamon was listed as 'optional'. It's one of the key ingredients!), I started baking.

A key step to baking snickerdoodles is rolling a ball of batter into a mix of cinnamon and sugar.
Mmmmm cinnamon sugar.
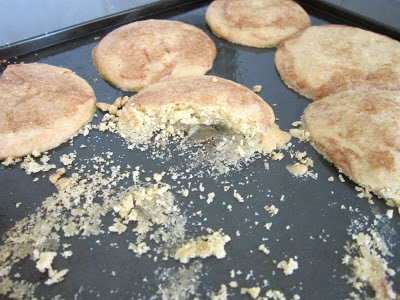
The cookies from the first batch didn't seem to be completely cooked on the bottom and they got a bit stuck on the tray, so I put them back in the oven for a bit longer. This didn't seem to do much, and my Mum wasn't home to ask, 'are these done yet??'. I was cooking solo.
I thought maybe it had something to do with the cinnamon sugar getting on the bottom of the cookies, so for the next batch I made sure not to get the cinnamon sugar on the bottom of the cookie balls.

This seemed to make things worse.
That, or turning to oven up a gas mark to see if that helped.

But whether the cookies ended up whole or in pieces they still tasted delicious, which is what really matters.

Though I'm still left wondering; why are they called snickerdoodles??

Sunday, 16 June 2013

This Week I...

...finished up some more bow necklaces and added them to my Etsy shop.
Check them out here.

I worked two more days at an infants school delivering workshops for the arts centre.
This time is was making hails stones, rain drops and snowflakes with the reception and nursery classes.

And I continued working on this fun project.
All will be revealed soon!

What did you guys get up to this week?

Thursday, 13 June 2013

White Rose Painting

To maintain my painting skills I produced this little paintings the other day.
It's from a photo that I've had on my computer for 3 years.
I think it was of a rose that I took away from a Letchworth Arts Centre event.

I like these little canvases - 7x11" - because the paintings don't take to long to complete. Depending on the level of detail of course.

I've got a few other paintings this size for sale on my Etsy shop. Check them out.

Tuesday, 11 June 2013

Ribbon and Gold Ball Bracelet

Coral and Gold Ball Bracelet Stack from New Look 
When I was shopping with my friends the other day I noticed these bracelets in New Look, the bottom one in particular.

One of my friends asked me if I look around at this stuff and think, 'I could make that'.
Well yes, I do.

I remembered these gold balls on wire that I've kept for ages.
They came off some Christmas crackers and I've held on to them thinking they might be useful.

The gold balls on the original bracelet are beads but since these gold balls are already attached to wire I used that to wrap them around a plastic hoop.

Then I wrapped ribbon around the hoop in between the balls.
I also tried using thinner ribbon around a thin bangle

They sort of look like they should be little bells that jingle, but I'm sure that would get annoying.

The best thing about this quick project is that it allowed me to use some of the things I've had for ages but never done anything with.

Sunday, 9 June 2013

This Week I...

...had two days work at a local infant school delivering workshops for the Letchworth Arts Centre.
The children were making aliens to stick on the string balloon planets that I made during my internship.

On Friday I had to pop to London because part of my braces had broken so I had to go to the dentist to have it fixed. It took all of 5 minutes.
So to make the train trip worth it I also checked out the Hunterian Museum.
It is awesome and gross. And awesome. And gross.
It's rows and rows of dead stuff in jars!
It's really fascinating but it's no secret that I'm a medical light-weight (I once fainted in a first aid lesson. There weren't even any pictures, the teacher was just telling a gross story) so the key was not too look at anything for too long.

There was a skull fused to another skull, a foot from someone who had elephantiasis, a skull that had had a tooth growing in the nasal cavity, the skeleton of a 7 ft 7" giant! It was awesome.
And gross.

On Friday night my friends and I had a long awaited sleepover.
It turns out that sleepovers are still as fun as they were when we were teenagers.

And then the next day, since none of us were working, we hit the shops, including Primark where we tried on these glasses.
Standard.

How was your week?

Thursday, 6 June 2013

Bran Cake

I'm a bran fan but it gets all up in my braces too much for me to eat it for breakfast.
#realtalk
So I had to come up with another way to use up the box of bran flakes that had been abandoned in the cereal cupboard.

My first thought is always cake so I googled bran flake cake recipes and came across this one on the NHS Change4Life website.
The first thing you have to do is put bran flakes and dried fruit in a bowl and add milk, so this recipe is basically breakfast in a cake.

The recipe calls for mashed bananas, apricots and sultanas. I decided to use sultanas, raisins and glace cherries instead because I don't like apricots and I find things don't last as long if they have banana in them.

This cake tastes healthy, which isn't a bad thing.
The addition of dried fruits makes all the difference, so it'd be interesting to try the recipe again with different combinations.

I've also found recipes for a chocolate bran cake and carrot cake bran muffins so I might try those to use up the rest of the box.

Tuesday, 4 June 2013

I made a bag!

I made a bag!
Guys, I'm pretty proud of this.

The black plastic-y leather looking fabric I used was an off-cut in the bargain bin at The Range.
I've previous used it to make a camera case and a bow necklace.
The lace on top is an old net curtain and I got the idea to add that from a re-style on Studs and Pearls.

I was able to sew this fabric using the sewing machine which was a relief otherwise my plans for the bag would have been ruined.

I also added some velvet ribbon round the edge of the flap because I thought it already has leather and lace, why not add another trend!

The strap is a detachable strap from another bag which I can clip on and off the metal rings which are from some old key rings.

I think my favourite part of the whole bag is the lining.
Firstly because I actually managed to sew lining, and second because it's pink and stripy.
The fabric is from an old pillow case but I'm not sure whose because I don't recognise it as one of ours... 

The bag fits everything I regularly carry!
My diary (yep, I kick it old school with a paper planner, rather than using the calendar on my phone), my purse, my glasses, my phone and I made sure to sew a little pocket onto the lining for my keys because otherwise I'll lose them at the bottom of the bag.

For the closure on the bag I've used self-adhesive magnet strips.
They're not that strong so I'll see how they go. They're not strongly stuck on so I can always change them for something else.
I just didn't want something that I had to sew onto the bag which might pull and rip the fabric.

I've used it a few times and it hasn't fallen apart yet, so it's going well!