Pages

Friday 30 September 2011

T-shirt dress

It started with a large mens tank top.
Which is just (just!) long enough to be a dress on me. When worn with leggings.
So how to make it look wearable?

First up I gotta belt it!
If only more problems could be solved by throwing on a belt.

Then decorate.
I attempted the multiple necklace print that's been going on, and referred to this tutorial from Jen at My Own Road.

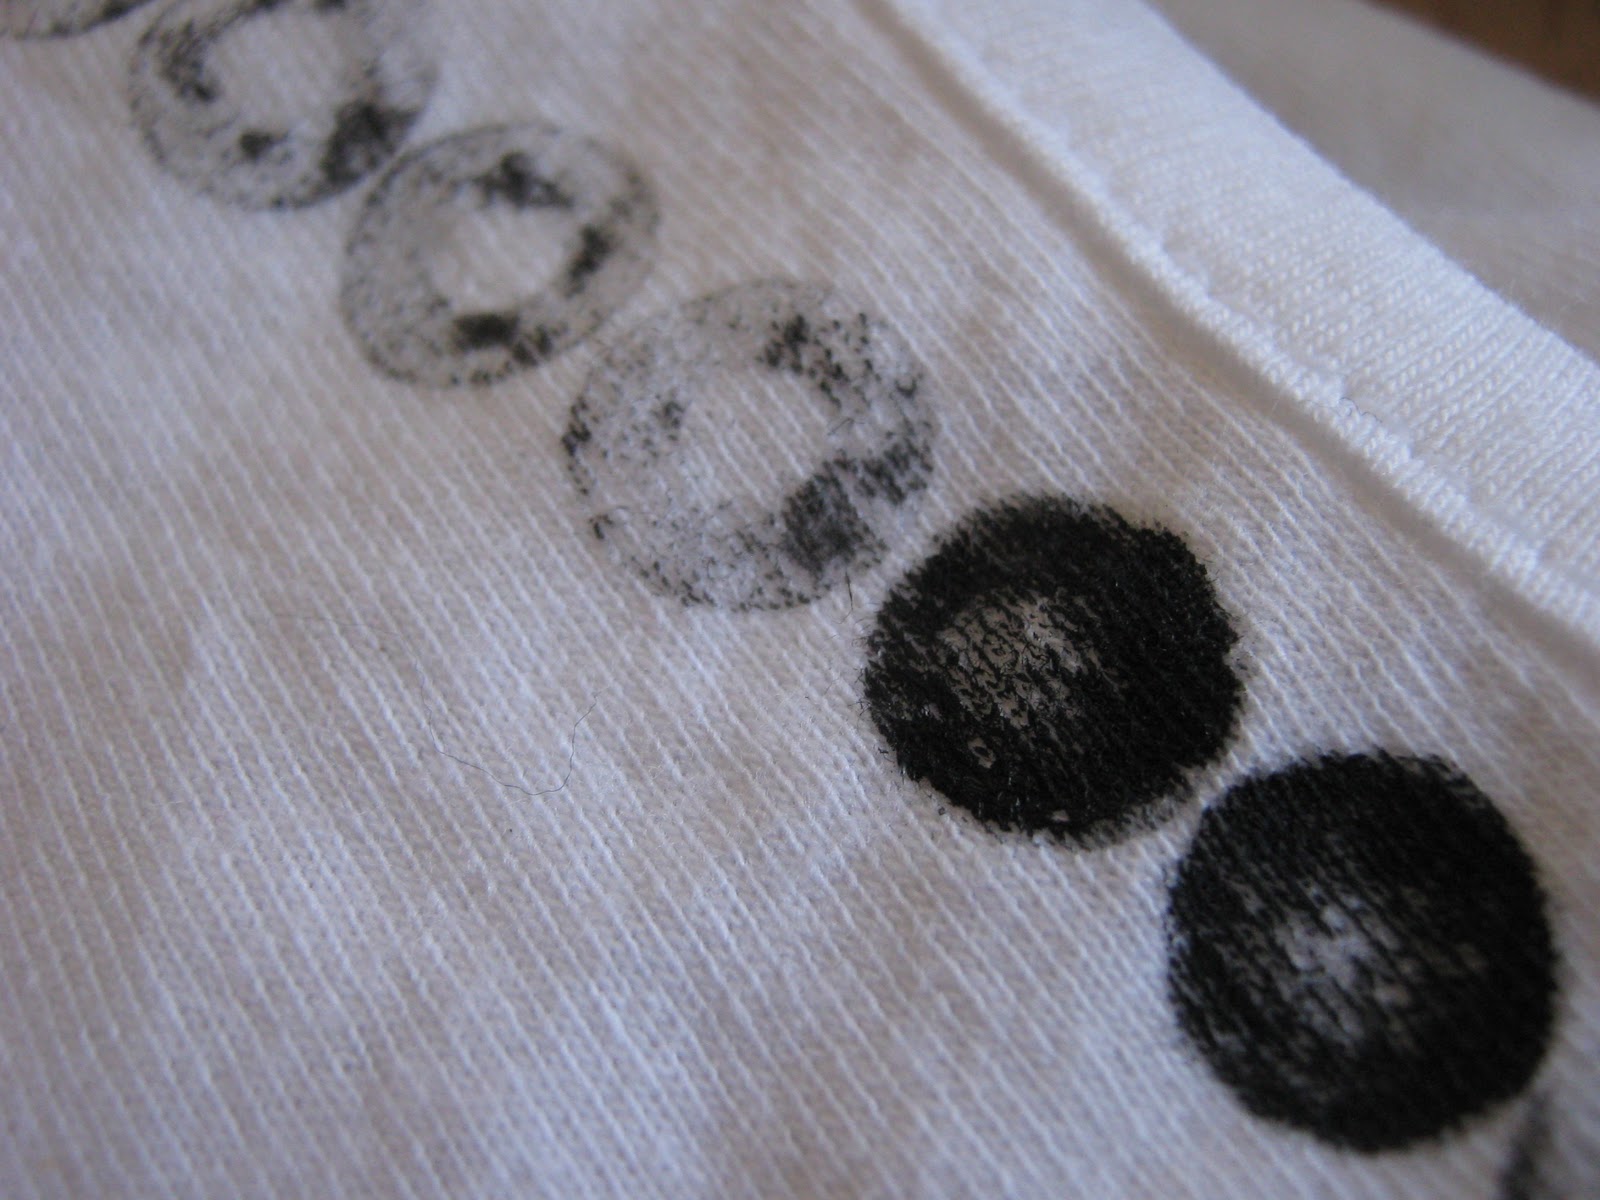
For the big beads I used the bottom of a pen to get perfect circles and then filled them in with a paint brush.

For the long chain I cut a thin drinking straw on an angle so it was an oval and used it to print the pattern.

The heart locket was just done freehand with a paintbrush.

After ironing over the fabric paint for 5 minutes it's ready to wear.

(Who can spot the photo me and Anthony Head from Buffy)
I think I did the beads a bit too wide across the shoulders so it looks a bit odd, but I've got the techniques down for doing more.

In other news friends I shall have to take a blog break for at least a week because my poor laptop is broken again.
I'm back to uni this weekend and I'm having to go back without it, so I'll be relying on uni computers and the kindness of my housemates.
I don't know how I will cope!

Wednesday 28 September 2011

Tire swing, swinging on a tree

This my newest miniature.
A tree with a tire swing.
It was a long time in the making but I'm happy with the finished piece.

I had tried to make a tree earlier in the summer but, well, it didn't turn out too good.
We shall call it the fail tree.

This is the fail tree.
I used chicken wire and modrock which was fun at the time (minus the chicken wire scratches on my hands) but far too bulky to look like a real tree.

Then I gave up for a while until I saw this piece by Lori Nix.
A tree!
And she explained how she made it.

So I was all set to go again with a new method.

I twisted some wire into a tree shape.

Then I covered the wire in Fimo/polymer clay. I used whatever colours I had since it was going to be painted over anyway, hence the random pink.
To get a tree bark texture I screwed up some aluminium foil, flattened it out again and pressed it against the Fimo.

Once it had been cooked in the oven (only falling over in there once) I painted it.

Then I had to put on the leaves.
The stuff you can buy in hobby shops for model railways is far too expensive for something I wasn't even sure would work, so I improvised.
I bought a cheap sponge and tore it into tiny pieces that I painted green.
Then I stuck them to the tree with PVA glue. One by one. With a pair of tweezers.

The tire was also made with Fimo (can't get enough of it after the success of the copper kettles) and I got the tread pattern by imprinting it with the tire of a Playmobile car.

And that's how I made my tree!

Monday 26 September 2011

*Imagine the Doctor theme tune as the title of this post*

If anyone is keeping tabs on what tv shows I watch, you can add Doctor Who to the list.
Well, you can pencil it in.

Anyway, I recently spied this Tardis console in a charity shop and bought it for my sister.


It's supposed to be part of a whole set that has all the other interior Tardis elements.
But for £3.99 who's complaining.
And did I mention that it lights up and makes noises. It totally does.

So my sister and I decided to make the rest instead.
There's a lot more that we could add but..well...we kinda gave up.
And it's the Tardis for the 10th Doctor. Cos they're all a bit different.

I also got this tiny Tennant at the charity shop for only 99p.

And here he is chillaxing on the rails, pondering the universe no doubt.

Here's a silly little stop motion of the Doctor in action.

Photobucket

Do you watch the show?
Who's your favourite Doctor?


Friday 23 September 2011

New painting

I've finally finished this triptych that my Dad wanted painted.
I've had it on the go most of the summer.
My Dad is kind of my biggest critic and kept telling me to go back and improve bits.

The image is from when we went to Wells-next-the-sea back in May.
It was cold and windy so I looked like this.

Le scenery.

Also I saw a dried up crab.
Awesome.

Wednesday 21 September 2011

Copper kettles

Here are some more details from the commission I'm currently working on.
Two copper kettles

I searched and searched for some junk that would give me the right shape for the kettles but I couldn't find anything so I decided to use Fimo/polymer clay.
This was the first time I'd used it for one of my miniatures but I don't know why I hadn't used it before because it worked so well.

The only copper coloured paint I had was spray paint but that worked out well as it gave a smooth, shiny finish.

The handles are wire with a little bit of masking tape wrapped around and painted.
I really like the way they turned out.
It's all coming together!
Not long before I can show you the final piece. 

Monday 19 September 2011

Light it up

The items in my Etsy shop were up for renewal so I took this as an opportunity to improve the photos.
After getting some good advice on the forums I made a simple light box (see how here) and that, plus a bit of photoshopping, has made my photos a lot better.
  

I get better photos when I use the light box outside in direct sunlight but I live in England and it's September.
There's not a lot of direct sunlight.
So using two desk lamps inside will have to do. I just have to make sure I set the white balance to tungsten.


I've also added a new button on my header where you will find all of my miniature work. Hopefully that will start filling up more when I go back to uni in a couple of week.

Friday 16 September 2011

Bow necklace

I got this load of leather looking PVC type material from The Range the other day for £2.70.
It's another cheap shop but it has a really great art and craft section.


To test out how well I can sew the material I made a little bow.
Because bows are awesome.

I thought it would've been to obvious to make the successful bow into a hairclip so I made it into a necklace instead.
I put eyelets into two of the corners then attached jump rings and a chain.
Eyelets are my new favourite thing and I want to put them in everything. 


It's kinda like a bow-tie!

Wednesday 14 September 2011

Joe Fig; my new favourite

Whilst doing some research for my dissertation I came across the artist Joe Fig.
He is amazeballs!
He creates miniature scenes of artists at work in their studios.
The level of detail is phenomenal.

Here's one of his Jackson Pollock pieces.
They kind of remind me action figures that you get for tv shows, that come with little props to set up a scene.
(I have a couple from Lost. Jack and Charlie in case you were wondering.)
Only these are artist action figures. And I want one. Or all of them.

He's made Chuck Close and his fascinating studio.
If you look back at this blog post about artist studios I actually used this image thinking it was a photograph of the real thing. That shows how realistic these models are.

I definitely recommend checking out Joe's website for all the other models he's made. He's a pretty good portrait painter too.

It's Andy Warhol!
Usually the use of figures in miniature models ruins it a bit for me, because they never look quite right and whilst the rest of the scene can look amazing, the figure always looks obviously fake. This is the main reason I don't use figures in my own work.
But these model artists are so well made and to the same standard as the rest of the piece that I think they're incredible.

Joe Fig makes the model I made of my studio space look pretty rubbish in comparison. Ha.

Sunday 11 September 2011

I made skirt!

All by myself, without my Mum's help.
Granted it is the worlds most simple skirt but I'm still proud.
Especially since the whole process involved putting a new bobbin the sewing machine.

I used this one-hour skirt tutorial on Craftzine, with a few tweaks, and I used fabric that I got at a jumble sale.

The fabric is a little weird, kind of a shiny-feeling polyester, but I love the retro pattern.


Friday 9 September 2011

When life gives you apples...


...make apple cake!


Like most years the apple trees in our garden have given us more than enough apples, so much so that if you come to my house you won't leave until you've been asked if you want a bag of apples to take home.
So my Mum's got more creative with ways to use them up including apple and blackcurrant jelly/jam, apple and rhubarb jam, and apple cake. Which is delicious.

The recipe came with a Jordans flour pack many years ago.


And here it is with a few of my Mum's alterations. 

Ingredients
(For sponge base)
5 oz/125g plain wholewheat flour
4 oz/100g butter or margarine
2 eggs
4 oz/100g brown sugar
1tsp baking powder
Apple juice to mix

For topping
2 large cooking or eating apples
1 tablespoon of granulated or caster sugar
1 tsp cinnamon


Method
Sponge:
Cream fat and sugar until soft and fluffy. Beat in eggs gradually. Mix flour and baking powder and fold in water or fruit juice to make a soft mixture. Put into greased tin and spread evenly.


Topping:
Cut apples into quarters' peel, core and trim. Slice finely into crescents. Arrange these in overlapping rows to cover top of raw cake mix. Sprinkle top with mixture of cinnamon and sugar to taste.
Bake in moderate oven 375-400oF/ Gas mark 4-5 for 30 to 40 minutes until cake mix is cooked. Cut into wedges, following the lines of apples.


And you don't have to feel bad about eating cake, because there's fruit in it!

Wednesday 7 September 2011

Miniature clock

I'm currently working on a commissioned miniature for a friend and this is a sneak peek of part of it.
A miniature clock.

It started out like this; a little diagram showing how many pieces the clock would be made of and the size of them.
Then I measured and cut out the cardboard pieces and labelled them corresponding to the diagram.
When working on this scale it's easy to loose bits so I like to be organised.

I used PVA glue to stick all the components together.

Then I painted the clock and added the details like the clock face which I bordered with a jump ring, and the handle and feet which I made out of wire.


It's so tiny!

Sunday 4 September 2011

Craft fair

Yesterday I had a table at a little, very little, craft fair at my local mill.
You know the one; where I held those craft sessions
And because of those sessions I didn't have to pay any commission on the things I sold (the table was already free) because I'd already given enough in terms of my time.
Win for volunteering! 

As well as selling my crafty accessories (which you'll soon see on my Etsy again once I get around to renewing) I also had a few little paintings, cards of my paintings, and bigger paintings for sale.

I didn't sell that much, but lack of commission meant I came away with a profit, and it was a good chance to perfect my stall layout for future endeavours and have a good chat with my friend Stef who was helping me out.

Friday 2 September 2011

Crochet Beads

 My Mum offered to make some crocheted beads for me after we saw some in Hobbycraft (otherwise known as my favourite place ever).

When they were done I threaded them onto some ribbon to make a necklace.

My Mum also tried making one using a ping-pong ball but I can't decide if it looks too big as part of the necklace. 

So I took it off to have it like this.

And I also tried spacing out the beads for a different look.

Which one do you prefer?